Kronalux® 2K-PU- Tile Floor-Coating 899

Painting floor tiles with 2K-PU tile varnish
- Extremely fast drying time: tiles can be fully loaded after 24 hours
- Suitable for floor tiles, bathtubs, screed, concrete, steel, magnesite or hard concrete surfaces and non-absorbent substrates
- Very good adhesion to the substrates - without primer
- Noble silky gloss appearance
- No dirt collection in the joints
- *NEW* Can be tinted in RAL and NCS
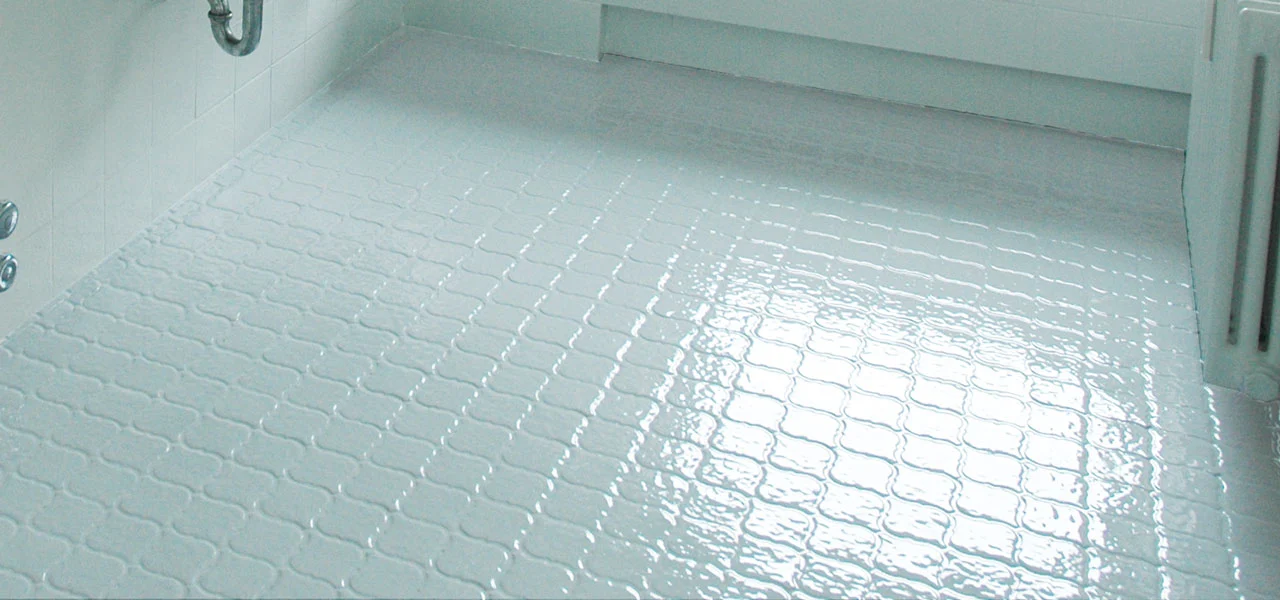
Kronalux® 2K-PU-Tile Floor Coating 899 is a high-quality two-component reactive coating for heavily used tiled floors in bathrooms and kitchens. The coating can be applied quickly and effectively, as it does not require any additional primer. After a short drying time of 24 hours*, the floor tiles can be used again immediately. This ensures that the rooms can be used again quickly. The tile varnish is largely resistant to water, petrol and diesel fuel, road salt, diluted alkalis, weak acids and common household cleaners. Thinner: Special Thinner 97. Our tile varnish is available in white.
* at 20°C/55% r.h.
Resistance of 2K tile floor coating to various stresses
- Water, alcohol
- Tyres, plasticisers
- Motor oil, diesel, mineral oils
- Road salt solution
- Mild household cleaners
Paint for concrete, screed
Mineral substrates must be well set before the coating is applied; new concrete must be at least 4–6 weeks old. The substrate must be dry, clean, grease-free and capable of holding the paint. Loose and crumbling layers must be removed. Concrete and screed must still have sufficient absorbency to ensure that the tile paint adheres. Any cement paste or sinter layers on the surface of the substrate must be removed by sandblasting, milling or treatment with dissolved citric acid before painting. Oily concrete surfaces that have already been used are best cleaned by brushing off with JAEGER 080 Special Cleaner or alkaline cleaning agents before painting. Rinse with plenty of water or a steam cleaner. Then allow surfaces and substrates to dry thoroughly. Adhesion of the coating is affected by moisture on the back.
Coating on magnesite or hard concrete surfaces and non-absorbent substrates
Remove wax or care products from the surfaces using nitro thinner before painting. Sand the substrate or acidify with citric acid, wash with water and allow to dry. If necessary, pre-coat with Kronalit® Epoxy-Grundfarbe 819 + 5% Katalysator 883 to achieve better adhesion of the coating.
Painting on steel
The substrate must be dry and clean, free of rust, scale, grease and chemical contamination. Use Jaeger Multigrund 715 for corrosion protection.
Painting over old coatings
As a rule, painting over old coatings is not a problem. Sand the surfaces with the old coatings, so our tile varnish will also adhere without an adhesion primer. However, we recommend preliminary tests to check the adhesion. If these are positive, you can start painting over the old coatings.
Not suitable for use on glass. Carry out preliminary tests on plastics.
![[Translate to English:] Bodenfliesen streichen](/fileadmin/_processed_/e/2/csm_Bodenfliesen-streichen_d69ec0a2b7.webp "[Translate to English:] Bodenfliesen streichen")
Step 2: Preparing the components of the tile varnish for floor tiles
The two components of the tile varnish are mixed together with Hardener 899 000H in a ratio of 10 : 1 (parts by weight).
After mixing the tile paint, the pot life is approx. 3 hours at 20 °C (shorter pot life at higher temperatures). During this time, the tiles on the floors or other surfaces can be painted with the tile paint – after that, the tile paint is no longer suitable for painting.
Step 3: Applying the tile varnish to floor tiles or other surfaces
Apply 1-2 coats of the ready-to-use varnish to the floor tiles or other surfaces. No additional adhesion primer is required. It is important to use a solvent-resistant roller with a 6 mm polyamide pile – a brush can also be used for the edges. It is also possible to apply the coating using a spray, cup gun and 3mm nozzle.
Step 4: Drying time after painting the floor tiles
The last step in the instructions for painting floor tiles is to allow the tile varnish to dry after painting. However, the coating only needs 24 hours to do this. During the entire processing and drying time, the temperature of the material, substrate and air must not fall below 5°C or exceed 30°C. The humidity should be between 30 % and 75 % relative humidity during the entire painting and drying time. After painting, the silicone joints can be retraced and we recommend JAEGER Special Thinner 97 for cleaning the rollers and tools.
Step-by-step instructions for painting floor tiles
Tools for painting floor tiles
- In addition to the tile paint, you will need a solvent-resistant roller with a 6 mm polyamide pile to apply the tile paint. You can also use a brush for the edges.
- Depending on the surface, sandpaper or sanding fleece, putty utensils for touching up and various cleaning agents are required for preparation.
Step 1: Preparation of the tiles and surfaces before painting
Painting floor tiles
The tiles in the bathroom or kitchen floor must be clean, dry and free of limescale before painting. The joints must be intact – cracks in the joints or even in the tiles must be filled in advance. This means that the tile varnish can be applied without any need for an adhesive primer. Silicone joints must be removed before painting.
Painting on bathtubs
The tile varnish is suitable for painting both enamelled and acrylic bathtubs. Clean the surface of the tub well beforehand, descale it, then rinse and dry it. In the next step of preparation for painting, the tub surface is sanded until it is matt, using sandpaper or sanding fleece (grain 120 + 320) – particularly rough areas must be sanded smooth before painting. Rinse and allow to dry well before coating. Fill holes/chipped areas with EP putty and sand after drying (enamelled trays). Allow to dry for at least 5 days at 20 °C.
product data
spreading rate
| paint/roll | spraying |
|---|---|
| 3-4 m²/kg |
item number/shade
| item number | shade |
|---|---|
| 899-9010 | white |
size of trading unit/box content
| size of trading unit | box content |
|---|---|
| 1,1 kg | 1 |
| 3,5 kg | 1 |
suitable products


